Monday, February 29, 2016

DIY Square Frame Centerpiece Accent

Today we are going to make this adorable rustic layered frame using inexpensive materials, which makes this the perfect DIY project for a party or wedding!


The supplies we need include:

-square wood frame $2
-square laser cutout frame $1.99
-E6000 glue
-chalkboard paint 
-brush
-Americana acrylic paint in the color Cactus
-Ceramcoat acrylic paint in the color Apple Green
-Wood Stain in the color Walnut


First,
Let's paint the square laser cutout frame with our acrylic Americana paint in the pretty color Cactus. Only paint the top, and leave the sides and crevices brown.

Then, before the paint completely dries, add a bit of the lighter and brighter Apple Green
to the areas you want to have a light highlight. Then with your brush blend outward towards the darker green. This will give the frame depth and dimension.
(Any two similar colors will also blend nicely. IE: Dark Pink/Light Pink 
But ideally you want whatever two colors you choose to match the brown background)


Next, let's stain the main frame with our Walnut color. (These wood stains are sold in a wide variety of colors including pink, red, blue, and green. I chose Walnut because it matched the edges of the laser cutout frame.) 


The wood stains come with their own sponge applicator, but in order to keep it new, it's recommended to squeeze the wood stain into a sponge-on-a-stick and use that as our dauber. Just squeeze the bottle to apply, and apply as many times as you like to get a darker color. I stained the front and the sides.


Next, we will want to paint the glass with our chalkboard paint and brush. 2 layers is recommended. Dry time is 30 mins to an hour, depending on thickness of layers applied.
Let sit overnight before writing on surface with chalk! 


And that's how easy it is to put together this cute frame!


Bethany @ Enchanted Lake

Friday, February 26, 2016

Hand-Painted Signs

Hey, everyone!  
.So, the weekend is here and if you're still trying to satisfy that craft craving you've been having there is still an awesome selection of wooden signs in all shapes and sizes waiting for you at all of our Ben Franklin Crafts locations!  This past week, we've been cranking out some samples for you guys to check out.  I chose a few wooden signs because I've just had a hankering for painting this past week.  Being surrounded by all these unfinished wood products just does this to you I guess.lol  


All I had to do was let the creative juices flow.  These palettes were only $3.99!  I couldn't pass up the opportunity because there's just so many ways to go with these.  Landscapes, Quirky signs, Sassy Alpaca in sunglasses, pineapples...  The possibilities are endless.
All you needed was a variety of brushes, a few Delta Ceramcoat and Satin Americana acrylic paint colors and some decorative ribbon!  Below, I even made a Spring/Easter-themed piece using one of the mini signs.  These are $1.99 each, and they already come with the hooks attached so that you could hang them up.  Not to mention there is a variety of shapes to choose from: scalloped rectangles, arrows and ovals like this little guy here.

 This small sign can be adorable as a little Easter gift or just as seasonal decor for your home. 
 This is also a great activity to do with kids.   
Three colors, and a pom pom.  How simple is that?

As always, have fun!
Erika @PC

Thursday, February 25, 2016

Elegant Jewelry Box

Hey there, Crafters! 

              As Erika mentioned in her last post, we've had a lot of new unfinished wood come in to all of our stores. We were checking out all of these awesome new items that have been added to our selection, and this pretty little decorative box popped out at us. Already elegant with its hinged doors and little shelves we decided it was just begging to be dressed up and made even more up-scale with a few amazing products.

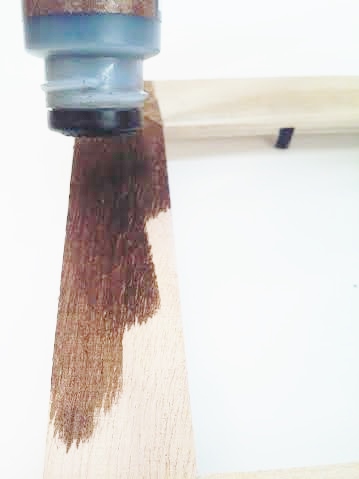
First, I stained the entire piece using our Gel Stain in Oak. I absolutely love working with this particular product, as it’s so easy to use. My favorite method is to use a very slightly damp sponge; it makes application go super quick and by having just that tiny bit of moisture it accents the grain of the wood even more. Since I wanted the stained look rather than a one-toned painted look, I wasn’t worried about the variance of light and dark shades. I think it adds a certain depth to it!

            Once my stain was as I wanted it, I needed to give it a bit to dry so I moved on to preparing these gorgeous leg fixtures by Tim Holtz. I am a big fan of gold and will try to fit it in where ever I can, and what’s better to dress something up than a gorgeous metallic accent? Since I knew that I’d be adding gold to the box, I wanted to make sure my legs tied in nicely. I went ahead and treated the legs with Metallic Lustre's Gold Rush. This is another product that’s super easy to use, and very versatile as it’s made for use on a number of different surfaces. To apply it, you can use a sponge, cloth, piece of felt or, (if you’re like me,) your finger. The consistency is almost like a dry paste; I simply applied a small amount to the high points on the legs using the pad of my index finger, creating a relief effect. If necessary it can be buffed once dried but in this case it didn’t even need to do that! 


           Even though it only took me a few minutes to prepare the legs, by the time I was done the stain was dry enough to work on. I set up for my next step by determining how much gold I wanted on my finished piece, (a lot,) and where I wanted to put it (everywhere!) I knew I might get a bit over-excited with the gold so I chose to tape off the areas I didn’t want to risk gilding with painters tape, but that’s totally optional. I then applied the same Metallic Luster in the same way, with a bit of a heavier hand because the wood is porous and will absorb a bit of it.

         The trickiest part of this whole project was actually attaching the legs, only because they are a bit too tall to allow the doors to swing open if you attach them flush with the base...which I found out the hard way! To resolve this, I applied hot glue to each corner, pressing it flat using the handle of my paint brush with a bit of wax paper to add the 1/4 inch I needed. A bit more hot glue, and I was able to affix them with ease! 

        At this point we have a beautiful, fully finished box. It could easily be left just as it is or coated with a sealant and look wonderful as a jewelry or keepsake box. I wasn’t ready to end the fun, though so I decided extra embellishments were in order!

        Tune in next time to see the rest of this project, where I’ll be wood-burning a gorgeous piece of french scroll work on to the corners, applying a custom decoupage background and maybe even changing out the clasp before wrapping it up with a glossy finish! 

Want to make your own elegant keepsake box? Come visit us and we'll be happy to get you set up with everything you need! Thanks for reading! 

-Chelsea @Mapunapuna

Tuesday, February 23, 2016

Crankin' Out Crafts, Episode 466 - Fairy Garden

Create your own fantasy fairy garden with items available at HouseMart Ben Franklin Crafts stores or even things you can find around your garden or house.


Supplies used:

Pallet project:
Air plants
E6000
Ubermatte finish paint
Tim Holtz distressed ink

Tray project:
Ubermatte finish paint
Tim Holtz distressed ink
Super moss
Stones and pebbles
Well
Plants
Succulent
Bird house
Sticks

Thursday, February 18, 2016

How Wood You Decorate These?

Crankin’ Out Crafts, Episode 463 - Beach Signs


Watch as JFlo transforms unfinished wood into beautiful home decor using various paints and markers. 


Supplies Used:
Satin Paint by Americana
Ceram Coat Paints
Paintbrush
Montana Acrylic Marker
Starfish
E6000
Ribbon

Crankin’ Out Crafts, Episode 464 - Photo Holders

JFlo explains how to transform raw unfinished wood into cute photo holders and displays.


Project 1: Wooden Base Photo Holder
Chalky Paint
Paintbrush
Wire spray with seashells
Photograph

Project 2: Pallet
Ceram Coat Paints
Tim Holtz® Distress Ink Pads
E6000
Wooden clothespins
Starfish
Optional: Wire spray with seashells

Crankin’Out Crafts, Episode 465 - Pallets

JFlo shares creative pallet decor ideas.


Unfinished wooden pallet
Acrylic Paint
Paintbrush

Pallet 2:
Ubermatte Spray Paint
Ribbon
Montana Acrylic Paint Marker

Wednesday, February 17, 2016

Freshly-Squeezed Caddy

Good Day, Crafters!
This past week, we've had a huge load of unfinished wooden products come into our stores.  Seriously, I can't stop looking at them because there are so many ideas that just pop into my head!  So many different shapes and containers to choose from. 


Today, I chose a small pen holder for one of my first projects.  As you can see, this has three slots where you can store your pens, pencils and other tools.  Something small just to clear up the desk area.  I also chose an adorable lemon-printed paper by Dear Izzy to Mod Podge onto the sides. A bright and fun fuchsia color to make it pop. I created different shades by mixing in some white acrylic and created a distressed effect, keeping the base the darkest fuchsia. 
I also wrote a quote on the front panel with an acrylic paint pen.

So, if you guys get the chance, stop by at one of our stores to check out our awesome selection of unfinished wood products and decorate your very own caddy, treasure chest, serving tray, wish box, frame or sign today!

Erika @ PC

Tuesday, February 16, 2016

Crankin' Out Crafts - We Sell Seashells At The Craft Store


Crankin' Out Crafts - Episode 461
Floating Sunrise Shell Pendant

Lynn makes a floating pendant by adhering an L Bell component onto the back of a sunrise shell. So easy to do for yourself!


Click here to watch this Crankin' Out Crafts episode

Supplies Used:
Sunrise shell
UV Resin
UV Resin Lamp
Chain
Hair gomu part (half tube)Optional: Rubbing alcohol


How to Wire Wrap a Shell
In this episode Lynn shows you a basic technique of wire wrapping a scallop shell.


Supplies Used:
Scallop shell
14” thick wire
Ruler
Round nose plier
6-Step bail making plier


Wednesday, February 10, 2016

Beaded Heart Charm

Hey, crafters!   Valentine's Day is right around the corner and we're all
 looking for small gifts to make for our friends and families.  If you're looking for something 
to make that is unique and straight from the heart, how about a cute handmade keychain?  
We will be having a special demo tomorrow for a Beaded Heart Charm!  It's going to be from 12:30 to 1 pm at the Pearl City location. 

This demo is completely free and our beading instructor, Gayle, will be happy to answer any questions you may have, so come check us out!
Don't forget you can also cruise around the store for some ideas on last-minute Valentine's cards, scrapbook pages and various other crafts.

See you tomorrow!
Erika @ PC

Monday, February 1, 2016

Heart Candy Jar

Hey Everyone!
Today's craft is a cute DIY Valentine's Day candy jar! Or even use it as part of a centerpiece with battery operated firefly lights, as I have here. You could even use it in your bathroom for your cotton balls! 


SUPPLIES:


Clear jar with lid (these come in three sizes and I used the medium size)

Acrylic Vinyl/Contact Paper/Sticker (I used the acrylic vinyl we sell for a much cleaner line)

Montana Spray Paint (I used a color called Frozen Raspberry, but pick any shade of Pink that you love!)

Rubbing Alcohol is a must!

White BoBunny Perler Pen (I used white)

Scissors/Exacto Blade

White Sheer Ribbon 

Heart Shape for tracing. (I used one of the dollar flat wood hearts that we sell!)

One Pen or Pencil for tracing

***OPTIONAL: Firefly Lights in warm white and battery operated with 3 AA batteries
***OPTIONAL: White Pom-Poms (as pictured) in assorted sizes


First, take your clear jar and wipe down the entire outside with rubbing alcohol using a rag or something that won't leave streaks or debris. 

Set aside to dry. Also remove the lid, we won't need it again until the very end.

Remember, don't touch the outside after wiping down! The rubbing alcohol ensures that our spray paint will coat our surface evenly, without smudges or fingerprints showing up. 

Next, take your heart shape and your vinyl and trace your heart. Then cut out heart shape.


Then take your heart cut-out, peel the back off and apply to the jar (without touching the glass with your fingers!)


In a well ventilated area, and over newspaper or a cardboard box, coat the entire rounded outside of your jar shape. Do not spray the lid. 


(In order to prevent the spray paint from going inside the container, place a small paper circle on top to block the fumes and paint.)

Let dry for 45 mins to an hour. Sunshine helps.

Then carefully peel the vinyl heart off, again without touching the painted glass surface if possible (just in case of scratches)


Almost there! At this point, take out the white Perler Pen and squeeze out tiny pearl shapes around the edge of your heart. 

The drops will round out as they dry.


Then we just need a pretty bow around the top and some goodies to go inside!!
I used about 14-18 inches of white sheer ribbon and trimmed to size.


And I put the assorted pom-poms inside with the firefly lights to make it glow, but feel free to use candy, or gumballs, or cotton balls!! You might even be able to use a small candle! (Just be careful with the lid, as the heat could burn and melt the plastic lining or blacken the glass.)


So cute right?!
Have fun!


-Bethany @EnchantedLake